Cowabunga Lite iOS 18.5 — 15.0 (2025)
Download iOS Themes and Tweaks [No Jailbreak]
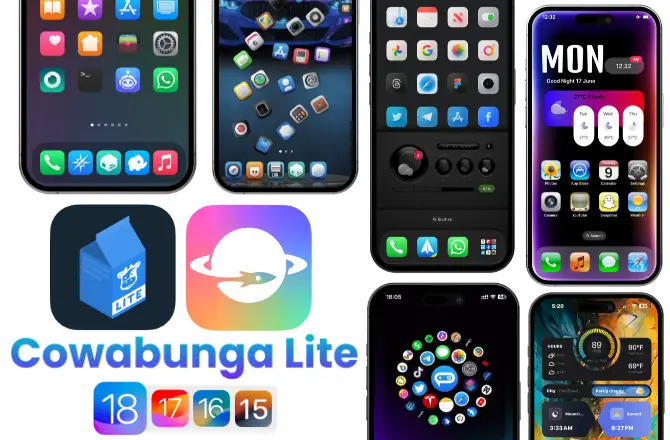
The Cowabunga toolbox is a tool for iOS devices that allows you to customize and tweak your iPhones or iPads without the need for jailbreaking. It is the MacDirtyCow and KFD exploits, that enable access to system settings and more features.
💡 Cowabunga Lite is an upgraded version of the Cowabunga toolbox.
Download Cowabunga Lite iOS 18.5 — 15.0 (15+)
Download Cowabunga Lite For MacOS
💡 Please download the compatible version below if the one above does not work for you.
Download Cowabunga Lite For Widows
Cowabunga Lite Compatibility:
Cowabunga Lite supports iOS versions
✅ iOS 18 – iOS 18.5, iOS 18.4.1, iOS 18.4, iOS 18.3.2, iOS 18.3.1, iOS 18.3, iOS 18.2.1, iOS 18.2, iOS 18.1.1, iOS 18.1, iOS 18.0.1, iOS 18.0
✅ iOS 17 — iOS 17.7, iOS 17.6.1, iOS 17.6, iOS 17.5.1, iOS 17.5, iOS 17.4.1, iOS 17.4, iOS 17.3.1, iOS 17.3, iOS 17.2.1, iOS 17.2, iOS 17.1.2, iOS 17.1, iOS 17.0.3, iOS 17.0.2, iOS 17.0.1, iOS 17.0
✅ iOS 16 — iOS 16.7.8, iOS 16.7.7, iOS 16.6.1, iOS 16.6, iOS 16.5.1, iOS 16.5 , iOS 16.4.1, iOS 16.4 , iOS 16.3.1, iOS 16.3, iOS 16.2, iOS 16.1.1, iOS 16.1, iOS 16.0.3, iOS 16.0.2, iOS 16.0.1, iOS 16.0
✅ iOS 15 — iOS 15.7.6, iOS 15.7.5, iOS 15.7.4, iOS 15.7.3, iOS 15.7.2, iOS 15.7.1, iOS 15.7, iOS 15.6.1, iOS 15.6, iOS 15.5, iOS 15.4.1, iOS 15.4, iOS 15.3.1, iOS 15.3, iOS 15.2.1, iOS 15.2, iOS 15.1.1, iOS 15.1, iOS 15.0.2, iOS 15.0.1, iOS 15.0
Cowabunga Lite supports iPhone models
✅ iPhone 16 Pro Max / iPhone 16 Pro / iPhone 16 Plus / iPhone 16 / iPhone 16e
✅ iPhone 15 Pro Max / iPhone 15 Pro / iPhone 15 Plus / iPhone 15
✅ iPhone 14 / iPhone 14 Plus / iPhone 14 Pro / iPhone 14 Pro Max
✅ iPhone 13 / iPhone 13 Pro / iPhone 13 Pro Max / iPhone 13 Mini
✅ iPhone 12 Mini / iPhone 12 / iPhone 12 Pro / iPhone 12 Pro Max
✅ iPhone 11 / iPhone 11 Pro / iPhone 11 Pro Max
✅ iPhone XS / iPhone XS Max / iPhone XR
✅ iPhone X / iPhone 8 / iPhone 8 Plus / iPhone 7 / iPhone 7 Plus
✅ iPhone 6s / iPhone 6s Plus / iPhone 6 / iPhone 6 Plus / iPhone SE.
Cowabunga Lite for iOS 18 released!
Cowabunga Lite new update supports iOS 18 for both Mac and Windows users. Cowabunga More customizations are available for iOS 18 – 18.5 users without jailbreaking their devices.
Cowabunga Lite iOS 18 features
Cowabunga Lite for iOS 18 offers a wide range of customizations without requiring a jailbreak.
✨ Status Bar
✨ Control Center
✨ Springboard Options
✨ Internal Options
✨ Setup Options
✨ iOS 18 Siri custom operation iOS 18
New Siri UI Tweak for iOS 18 iPhone and iPad [No Jailbreak]
The new Siri user interface supports only iOS 18 beta devices. Without jailbreaking your device, you can run Siri UI customization with the Cowabunga Lite tool. You can use this tweak on your iPhone and iPad devices through both Mac and Windows PC.
Download Cowabunga Lite iOS 18 for Mac – Enable New Siri UI
Guide:
Step 1: Download the above Cowabunga Lite iOS 18 file from your Mac.
Step 2: Open it through the Cowabunga Lite app.
Step 3: Connect your iOS / iPadOS device to Mac.
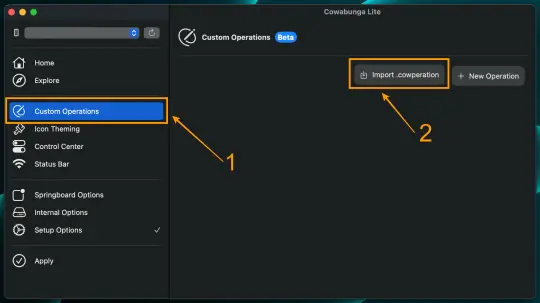
Step 4: Click the `Custom Operations` tab in the left sidebar (Cowabunga Tool).
Step 5: Click the Import .cowperation button, select the downloaded “Cowabunga Lite iOS 18” file.
Step 6: Click on the Edit button, and select Enable.
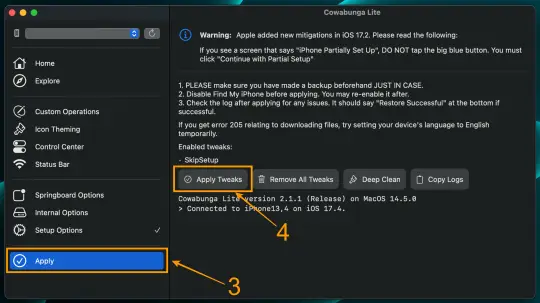
Step 7: Back to Cowabunga Lite home, click on the Apply tab in the left sidebar.
Step 8: Then click the Apply Tweaks button.
Download Cowabunga Lite iOS 18 for Windows – Enable New Siri UI
Step 1: Open up Cowabunga Lite on Windows.
Step 2: Connect your iDevice to Windows PC.
Step 3: Make sure the SkipSetup option is selected in the Setup Options tab.
Step 4: In File Explorer, go to
%APPDATA%/ CowabungaLite/ Workspace (or paste the path into the Run app), find your UUID, then go to SkipSetup/ManagedPreferencesDomain/ mobile.
Step 5: Add the file com.apple.assistant.plist that you downloaded using the above button.
Step 6: Back to Cowabunga Lite home, click on the Apply tab in the left sidebar.
Step 7: Then click the Apply Tweaks button.
Get the old photos UI back in iOS 18 beta 2
You can recover your old photos using the Cowabunga Lite tool. There are two methods: using a Mac or a Windows PC.
Requirements:
- Your device must have iOS 18 to iOS 18 beta 2.
- Mac or Windows PC.
Recover old photos using Mac (iOS 18 beta 2)
💡 Important: Download the “Old Photos UI.cowperation” file in the Mac folder (click the above download button, then go to Mac).
Step 1: Open Cowabunga Lite on your Windows PC.
Step : If you are not installed Cowabunga Lite yet, follow the installation guide →
Step 3: Connect your iOS 18 beta 2 device to the Mac.
Step 4: Click the `Custom Operations` tab in the left sidebar (Cowabunga Tool).
Step 5: Click the Import .cowperation button, select the downloaded “Old Photos UI.cowperation” file.
Step 6: Click on the Edit button, and select Enable.
Step 7: Back to Cowabunga Lite home, click on the Apply tab in the left sidebar.
Step 8: Then click the Apply Tweaks button.
Recover old photos using Windows PC (iOS 18 beta 2)
💡 Important: Download the “Old Photos UI.cowperation” file in the Windows folder using the above download button, (Windows > Old Photos UI > Add > click the “com.apple.mobileslideshow.plist” file,).
Step 1: Open Cowabunga Lite on your Windows PC.
Step 2: If you are not installed Cowabunga Lite yet, follow the installation guide →
Step 3: Connect your iOS 18 beta 2 device to the Windows PC.
Step 4: Make sure the SkipSetup option is selected in the Setup Options tab.
Step 5: In File Explorer, go to %APPDATA%/CowabungaLite/ Workspace (or paste the path into the Run app), find your UUID, then go to SkipSetup/ManagedPreferencesDomain/ mobile.
Step 6: Add the file ‘com.apple.mobileslideshow.plist’ that you downloaded using the above button.
Step 7: Back to Cowabunga Lite home, click on the Apply tab in the left sidebar.
Step 8: Then click the Apply Tweaks button.
Remove ‘old photos UI back’ tweak using Mac
Step 1: Click the above button, go to the Mac folder, and download the “REMOVE Old Photos UI.cowperation” file.
Step 2: Follow the above method to remove the ‘get photo UI back’ tweak. Guide →
Remove old photos UI back tweak using Windows PC
Step 1: Click the above button, go to the Windows folder, go to “Old photos UI” > Remove, and download the “com.apple.mobileslideshow.plist” file.
Step 2: Follow the above method to remove the ‘get photo UI back’ tweak. Guide →
Cowabunga Lite Features iOS 18.5 – 15.0
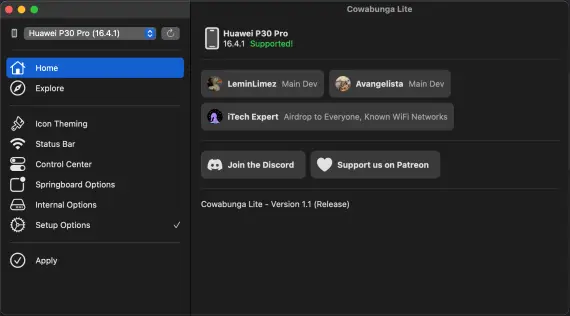
01. Cowabunga Themes (iPhone Icon Theming)
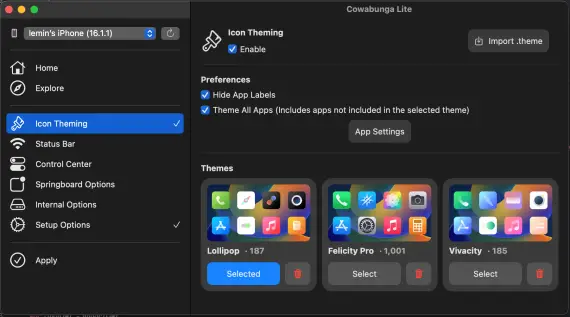
- With the Cowabunga Lite and Cowabunga tools, iOS icon themes can be installed.
- iThemeHub theme store support (iOS theme collection).
- Hide App Labels
02. Status Bar
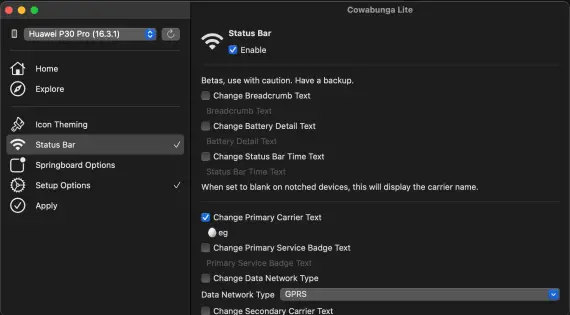
- Change carrier name
- Change secondary carrier name
- Enable/Disable the primary or secondary carriers
- Change the number of WiFi/Cellular bars
- Change the battery capacity and display detail
- Change time text and date text (iPad only)
- Change breadcrumb text
- Show numeric WiFi/Cellular strength
03. Springboard Options
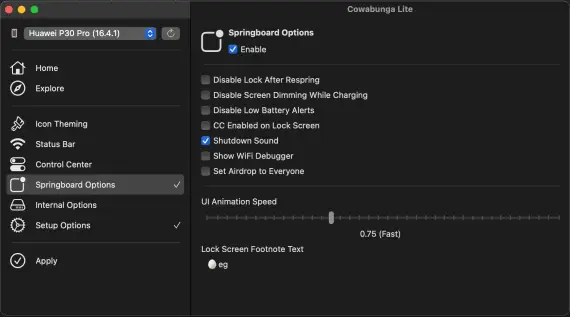
- Set an Airdrop to Everyone
- Disable Lock After Respring
- Disable Screen Dimming While Charging
- Disable Low Battery Alerts
- CC Enabled on Lock Screen
04. Control Center
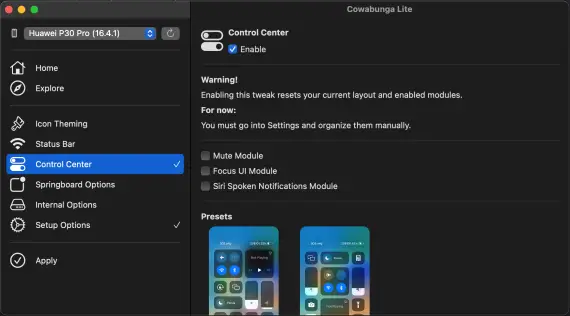
- Enable Mute Module
- Enable Focus Module
- Enable Siri Spoken Notifications Module
Also, additional features are offered by the Cowabunga and Cowabunga Lite tools.
iThemeHub Cowabunga Themes iOS 18.5 — 17.0
iThemeHub is a collection of themes for iPhone and iPad devices running iOS 18.5 – 17.0, iOS 16, and iOS 15.0. You can quickly install iThemeHub themes on your iOS or iPadOS device without jailbreaking it by using the Cowabunga tool.
Cowabunga Lite On macOS
Requirements:
- A Mac running MacOS 11.0 (Big Sur) or higher.
- An iOS device on iOS 15.0 or higher.
- Turned off ‘Find My’ while applying (can be enabled again afterwards).
- iPhone or iPad devices must not have MDM with backup encryption enabled.
Cowabunga Lite through macOS (Guide)
Step 1: Choose the Cowabunga Lite download link that is compatible with your macOS, and download it on your Mac device.
💡 If the Cowabunga version 2.1.1 above is not working for you, try the ones below.
Step 2: Unzip the downloaded file and open it.
Step 3: Connect your iOS device to your Mac.
Step 4: Run the Cowabunga Lite app.
Step 5: Start tweaking and customizing your device!
Cowabunga Lite through Windows PC (Guide)
Requirements:
- A Windows PC running Windows 10 or higher (Windows 10+).
- An iOS device on iOS 15.0 or higher.
- Turned off ‘Find My’ while applying (can be enabled again afterwards).
Step 1: Using the button below, download the most recent version of Cowabunga Lite for Windows PC.
Step 2: Unzip the downloaded file and open it.
Step 3: Connect your iOS device to your PC.
Step 4: Run the Cowabunga Lite app.
Step 5: Start tweaking and customizing your device!
Install Cowabunga Lite Without PC (No PC)
Cowabunga Lite is an upgraded version of the Cowabunga Toolbox app. Without a PC, Cowabunga Lite cannot be installed directly on iOS / iPadOS devices.
However, without a PC, Cowabunga Toolbox can be installed directly on iOS and iPadOS devices.
Cowabunga iOS 14.0 — 15.7.1 (Cowabunga IPA)
Cowabunga is an iOS customization toolbox without jailbreaking. Cowabunga is iOS themes and tweak toolbox for all iPhone and iPad devices.
Download Cowabunga IPA For iOS 15.0 — 16.1.2
Cluckabunga (KFD) For iOS iOS 16.0 — 16.5
💡 Cowabunga github official Page: open →
Cowabunga Compatibility
Cowabunga supports iOS versions
iOS 16 — iOS 16.2, iOS 16.1.1, iOS 16.1, iOS 16.0.3, iOS 16.0.2, iOS 16.0.1, iOS 16.0
iOS 15 — iOS 15.7.6, iOS 15.7.5, iOS 15.7.4, iOS 15.7.3, iOS 15.7.2, iOS 15.7.1, iOS 15.7, iOS 15.6.1, iOS 15.6, iOS 15.5, iOS 15.4.1, iOS 15.4, iOS 15.3.1, iOS 15.3, iOS 15.2.1, iOS 15.2, iOS 15.1.1, iOS 15.1, iOS 15.0.2, iOS 15.0.1, iOS 15.0
iOS 14 — iOS 14.8, iOS 14.7.1, iOS 14.7, iOS 14.6, iOS 14.5.1, iOS 14.5, iOS 14.4.1, iOS 14.4.1, iOS 14.3, iOS 14.2.1, iOS 14.2, iOS 14.1, iOS 14.0.2, iOS 14.0.1, iOS 14.0
Cowabunga supports iPhone models
iPhone 14 / iPhone 14 Plus / iPhone 14 Pro / iPhone 14 Pro Max / iPhone 13 / iPhone 13 Pro / iPhone 13 Pro Max / iPhone 13 Mini / iPhone 12 Mini / iPhone 12 / iPhone 12 Pro / iPhone 12 Pro Max / iPhone 11 / iPhone 11 Pro / iPhone 11 Pro Max / iPhone XS / iPhone XS Max / iPhone XR / iPhone X / iPhone 8 / iPhone 8 Plus / iPhone 7 / iPhone 7 Plus / iPhone 6s / iPhone 6s Plus / iPhone 6 / iPhone 6 Plus / iPhone SE.
Cowabunga Install Methods (Cowabunga Direct Install — No PC)
Cowabunga with TrollStore
Step 1: Download Cowabunga IPA using the above download buttons. — Cowabunga IPA
Step 2: Tap the downloaded IPA and select the ‘TrollStore’ IPA Installer app. If you have not installed TrollStore yet, download and install TrollStore first.
Step 3: After installation is completed, open TrollStore > Go to “Apps” > tap the installed IPA (Cowabunga).
Step 4: Start tweaking and customizing your device!
Cowabunga with SideLoadly (On PC)
Step 1: Download Cowabunga IPA on Windows or Mac PC. — Cowabunga IPA
- If you have not installed Sideloadly tool yet,. Follow suitable method given below to install it.
- SideLoadly for Windows PC »
- Sideloadly for macOS »
Step 2: Connect your iOS device to your Windows or Mac PC.
Step 3: Open the Sideloadly tool, drag and drop Cowabunga IPA (on PC).
Step 4: Tap “Start” button to install IPA
- If this is the first time you use the SideLoadly app, you will want to provide your Apple ID and password to verify your device.
- After the installation process is completed, you can see the Cowabunga app on your iPhone or iPad home screen.
Step 5: Go to Settings app > General > Navigate to VPN & Device Management.
Step 6: Allow the app to run using this certificate by tapping Trust.
Step 7: Start tweaking and customizing your device!
Cowabunga with AltStore
Step 1: Download Cowabunga IPA on your iPhone or iPad device — Cowabunga IPA
- If you have not installed AltStore yet,. Follow the suitable method given below to install it.
- SideLoadly for Windows PC »
- Sideloadly for macOS »
Step 2: Connect your iOS device to your Windows or Mac PC (AltStore installed).
Step 3: pen the AltStore app on your iOS device.
Step 4: Tap on the “+” icon at the top-left corner of the screen.
Step 5: Choose “Open in AltStore” and select the Cowabunga IPA file you downloaded.
Step 6: Wait for the installation.
Step 7: Go back to your home screen and open the app you just installed.
Step 8: If you can see the “Trust” alert message, — Go to Settings app > General > Navigate to VPN & Device Management.
Step 9: Allow the app to run using this certificate by tapping Trust.
Step 10: Start tweaking and customizing your device!